
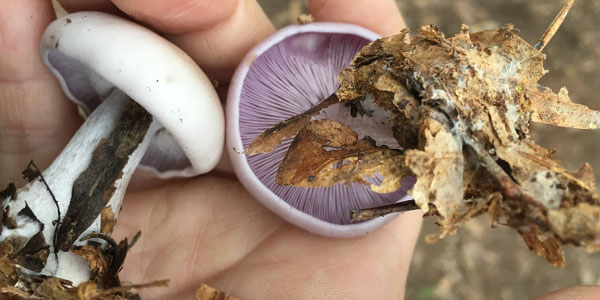
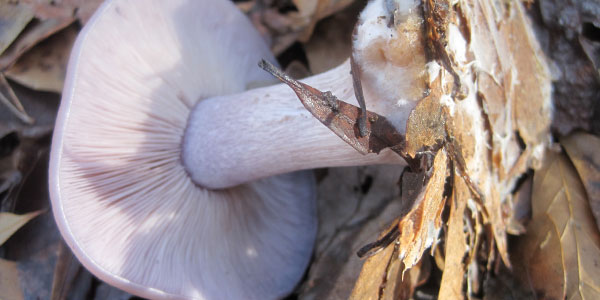
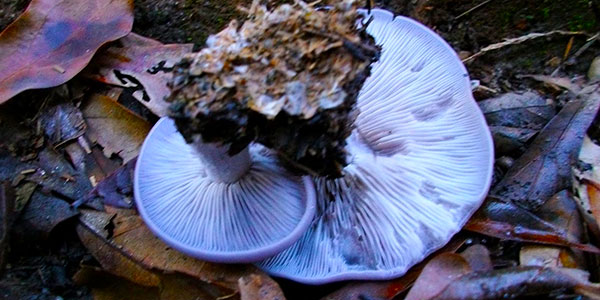
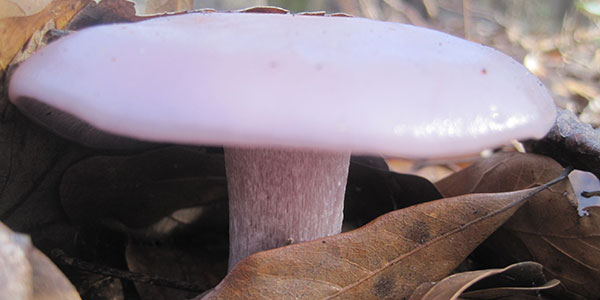
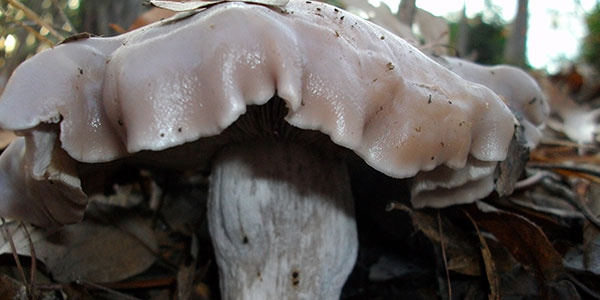
Blewits (Clitocybe nuda = Lepista nuda) are lilac to purple mushrooms that can be found fruiting during the fall and winter months.
They like a heavy frost or freeze to initiate fruiting, for this reason blewits will not fruit in tropical climates. They taste mild and silky, and are best sliced and seared before adding to creamy potatoes soups with a dash of Sherry!

A great recycler of hardwood leaves and compost, we mix this into our kitchen compost, shredded leaves, and mulch it into our vegetable garden, where it fruits. Two flushes a few weeks apart are normal. Beautiful purple-lilac caps. Spore print is white, this one can resemble a Cortinarius mushroom (spore print is rusty orange) so make sure you have a positive ID before you consume them!

What You Will Need
- Spawn.
- Substrate (up to 1 cubic yard = 27 cubic feet = 10×10 area, 4” deep=400 square feet), composted hardwood leaves, and composted manure/straw.
- Cardboard with dyes that do not contain heavy metals.
Method 1 (outdoor method)
- Prepare an area by creating a rectangular hardwood log frame for the bed in a shady area. You can use inoculated logs, like Reishi and Oyster, or just any wood that you have laying around (non treated). You can also add spawn to mulched beds around your home or garden.
- If there is a lot of vegetation, cover the entire floor with cardboard from flattened boxes. Water the cardboard until it is saturated.
- Sprinkle spawn lightly onto the cardboard over the entire surface.
- Add 3” of your substrate, and mix in a generous amount of spawn. Pack surface to get rid of any pockets.
- Sprinkle lightly with water.
- Add another layer of torn up cardboard, so that the moisture can make it to the bottom layer.
- Repeat steps 3 and 4, until you have reached a height of a little less than 6”.
- Cover with wheat straw or leaves to a depth of 1-2” to help preserve moisture and to shade the substrate.
- Water every day for the first week, every other day for the 2nd – 4th week, and then once a month thereafter, unless the bed receives sufficient rain.
Method 2 (containers, indoors)
- Soak substrate for 2 days, so it becomes nice and hydrated. Drain.
- Mix the spawn with the substrate well. If your pots do not have drain holes, make a few, so it can drain well.
- Stuff in pots, but leave two inches below the top for the casing layer. Store out of direct sunlight.
- Water your pots thoroughly every few days to keep the media from dehydrating. Let drain well.
- Check a few inches down a week later, to see if the spawn is colonizing the media. If you see any green mold in there, carefully scoop it out and spray that area with diluted bleach 1:10 solution.
- Once the media is nicely colonized (turned lilac/white), it is time to add your casing layer.

What’s Next
After 4-8 months, the mushroom mycelium, or filaments of the fungus will of the fungus will spread throughout the chips and penetrate the surrounding soil, distributing nutrients to nearby plants.
Check back on your patch often. Mushrooms grow extremely fast, once they start fruiting. You don’t want to miss this.

Casing Soil Application for Containers
It is beneficial to add a tablespoon of your native soil into your wet potting soil in case the microbes are not present in a sterile/store bought potting soil medium.
- Add a wet layer of potting soil, about 1-2 inches deep evenly over the surface.
- Keep moist by watering gently or misting to keep the layer from drying out.
- A plastic bag placed loosely over the pot can maintain humidity without suffocating the mycelium.
- A thin layer of annual grass or wheat seeds can also be applied to create a beautiful, functional micro climate and habitat for mushroom formation that elevates oxygen, and provides a dewy hideout for the baby mushrooms.
Fruiting
As the baby mushrooms start appearing, mist them often to prevent drying. It is critical that the baby mushrooms never dry out. Place the pots in bright, indirect light.
As they enlarge, reduce misting to occasionally. Excessive watering can attract bacteria that will cause rot and decay.

Picking and Storing
Mushrooms generally double in size every day. Pick them as the mushrooms start to slow or stop doubling in size. Do not water before picking. Wet mushrooms do not store well. Pick by twisting them gently out of the soil, trim clean, and store refrigerated up to 1 week in a paper bag. Mushrooms that are not cooked in a week, can be dehydrated and stored in an airtight container for other culinary uses.
Recipe
K’S NEW ENGLAND CLAM-LESS CHOWDER
Raeleen Wilson and Chris Tullar
Cooking with the Asheville Mushroom Club
https://ashevillemushroomclub.org/index.php/join-amc/merchandise
I have made this soup many times, and it is super delicious. It is my favorite way to prepare blewits, and I serve this soup sometimes at our Fall Cultivation Workshops. If you don’t want to wait for your blewits to fruit, you can substitute with oyster mushrooms.
Ingredients:
- 1.5 cups peeled and finally chopped potatoes
- 1 cup chopped and sautéed onion
- 1 cube chicken or vegetable bouillon
- 1tsp. Worchestershire sauce
- .5 tsp. Fresh chopped thyme
- .5 tsp. Pepper
- Butter or oil for sautéing
- 3/4 lb blewit mushrooms, cleaned and chopped
- 2 cloves garlic, chopped
- 2 cups milk
- 1 cup light cream
- 2 Tsp flour
- 1 tsp. Salt
- 2 Tsp. Kelp powder
- Oyster crackers to garnish
Method:
Boil potatoes, onion, bouillon, Worchesteshire sauce, thyme, and pepper in 1.5 cups water until soft. Sautee mushrooms and garlic in a small amount of butter or oil. Mix together the milk, cream, flour, and salt. Add milk mixture, mushrooms, and kelp to the potatoes and cook until thick and bubbly. Serve oyster crackers as garnish.

7 thoughts on “Growing Blewit Mushrooms in Your Garden or on Your Patio”
I started shiitake logs a little over a year ago. We have two logs that have had orange goo popping out all over the logs. One did this soon after inoculation, then the area that had the most orange goo spots turned a dark color and the bark is damaged. I thought that log was toast, and took it out of the log pile, but I noticed it is now starting to fruit at least one shiitake bud!
Just a couple of weeks ago I noticed another log all out in orange goo spots. What is this???? The goo spots are just lumps of a dull pumpkin orange, and just goo, no structure. About 1/8-1/4 inch big, these are like just drops of goo that oozed out of the logs, then goes nowhere, just sits there. Has anyone seen this? I live in the Willamette Valley of Oregon.
Class A response 🙂
It would be nice if you gave credit to the image sources. Good journalists do that. That way you won’t have to explain to Park Seeds why you stole their images… Don’t bother deleting them. They have already been sent the screenshots. Have a great day! 😉
Thank you for your comment Dr. Chaos. Did you know that I partner with Park Seed, and that they sell my mushroom spawn on their website? And did you also know that I supply them with my photos to use on their website? 🙂 🙂
I have moved from Greenville SC to St Louis MO. Have a large deck facing west and north. Also have some farm property in Sullivan MO in Franklin County. What kind of mushrooms would I be able to grow in these areas?
You can pretty much grow any mushrooms you want to. If you are a beginner, I would stick to the easy stuff like King stropharia, Oyster mushrooms or Shiitake mushrooms. 🙂